This past weekend I decided to go through Peter Shirley’s Ray Tracing in One Weekend, after which I made a few optimizations of my own. I never took a graphics course in college, so this was my first real exposure to the mathematics and C++ wizardry involved in harnessing the power of light to render cool 3D scenes like this:
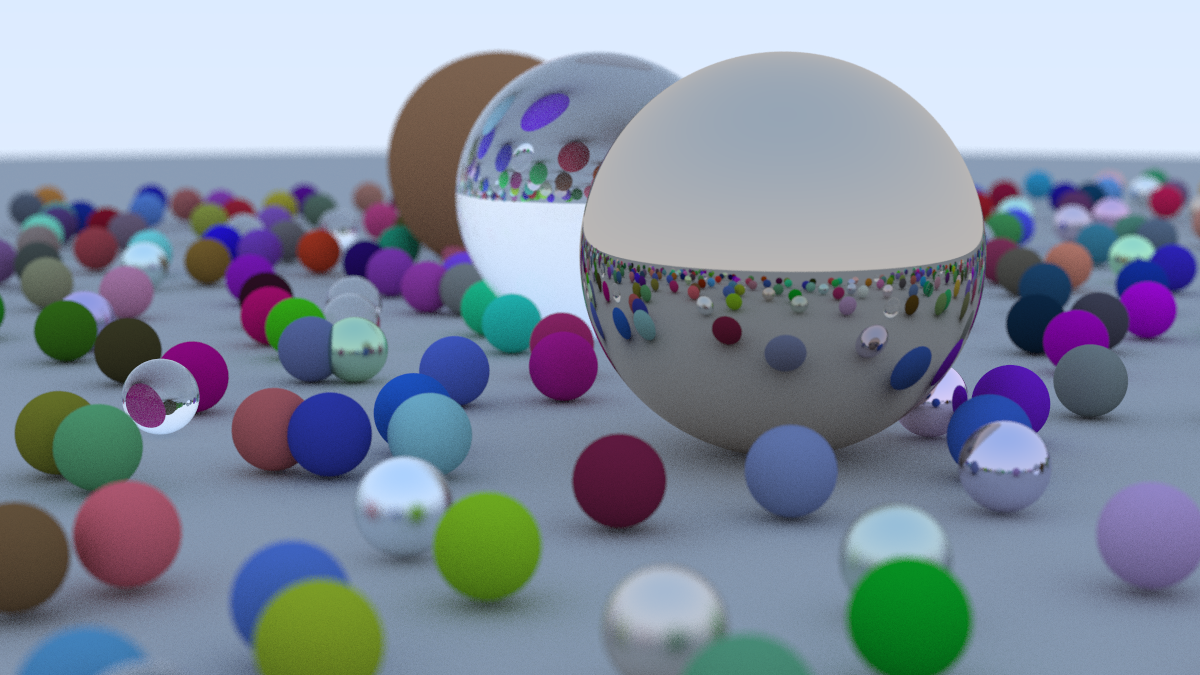
I highly recommend checking out the book yourself. I enjoyed seeing the image slowly come together as the author assembled pieces of geometry and physics to bounce rays across the scene. While the math still feels fairly above my head, it was a neat exercise overall. There’s something deeply satisfying about seeing such visual results coming from a relatively small amount of simple code.
Image Formats and Compression
To display the image, the author chose the PPM image file format, which is delightfully simple – just ASCII RGB values which they wrote to stdout and piped to a file. For my first optimization, I decided to use PNG instead with an in-memory bitmap, primarily for the improved data compression and also because the author had already wired up stb_image.h. It’s important to note that stb_image.h “favors compactness and simplicity, not optimal image file size”.
To lightly benchmark the image formats, I set the random seed to a fixed number (42 of course) and ran the book’s solution against my PNG version, with and without gzip. Surprisingly, the PPM format was slightly smaller than PNG when gzipped. I ran the PNG output through another tool, Cosmin Truţa’s OptiPNG, to try to squeeze out some more optimizations. This yielded a nice 31.98% lossless improvement, beating the gzipped PPM as expected. At 1200x675 pixels, 3x8 bits/pixel RGB, I think this is pretty good!
| file | size |
|---|---|
| image.ppm | 9.11MB |
| image.ppm.gz | 1.75MB |
| image.png | 1.79MB |
| image_opt.png | 1.22MB |
Speeding up with Multithreading
The book solution feels pretty slow, taking minutes to render a 1200x675px scene with 100 samples per pixel and a max ray depth of 50. While this is no where near the frames that an actual graphics card with a more sophisticated, well tuned graphics engine could pump out, I still thought it would be a fun exercise to unlock more CPU cores with some multithreading.
C++11 makes this relatively straightforward. Since I already moved the image bitmap into memory during the PNG implementation (writing each pixel to stdout for PPM requires sequential ordering), all I needed to do was wrap the inner loop contents inside of a lambda and toss it to a new thread. My first attempt dragged my MacBook Air M1 2020 down to crawl – I created a new thread for every single pixel, likely crushing the OS under the weight of scheduling all the tasks. Instead I decided to use a thread pool to limit the amount of concurrently runnings threads to 8, the amount of cores I have on my processor, queuing the rest. I combined that with a vector of futures to wait upon as well as an atomic counter to indicate progress, also choosing to dispatch a thread for each scan line instead of each pixel.
With this optimization, I brought the time from 6m30s (390.04s) to 2m31s (151.27s), a 2.5x speed improvement. I’m not quite sure why it wasn’t an 8x improvement instead – I can see 1137.44s of user time and all my cores lighting up. Throughout this process, I was particularly impressed about the thermals on my M1 chip – no fans or significant heat despite several minutes of 100% CPU usage. Perhaps there was some thermal throttling, or I introduced some overhead with the multithreading. Feel free to email me if you have any ideas!
Next steps may be to open up the Instruments.app that ships with XCode and start profiling, although I’m not sure I’ll ever get to the point of writing anything particularly efficient on my own. You can find my fork of the book’s source code with the PNG and multithreading commits at JacobGo/raytracing.github.io.